> ## Documentation Index
> Fetch the complete documentation index at: https://docs.cedarai.com/llms.txt
> Use this file to discover all available pages before exploring further.
# Organization
> Manage your organization hierarchy, layers, and access controls.
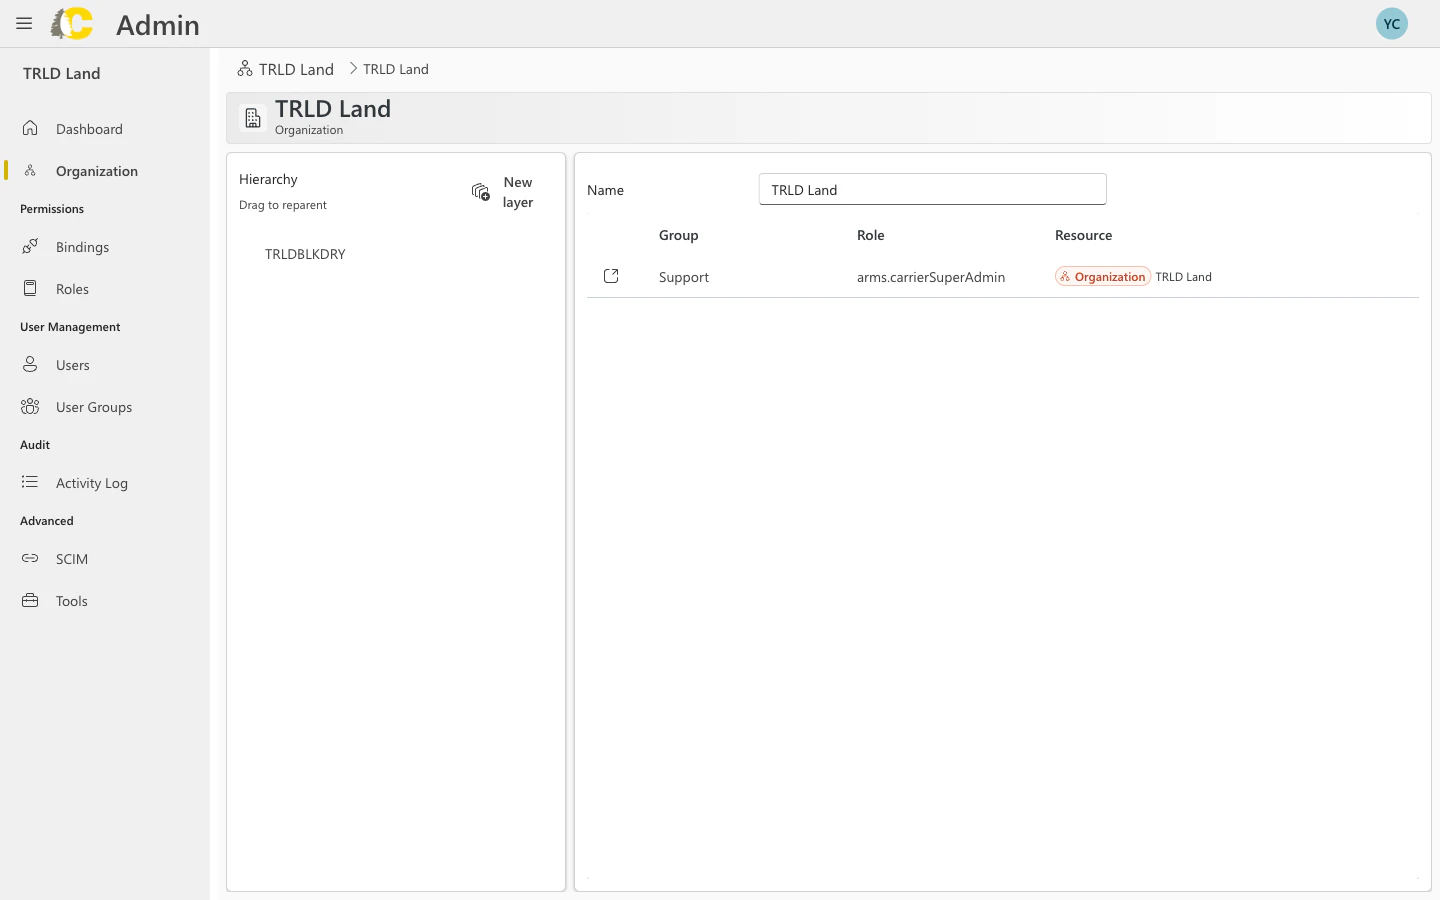
The Organization page becomes available after Cedar sets up your initial organization structure. Once enabled, you can manage your own organization hierarchy, including creating layers and assigning access.
Once your organization is set up, the **Organization** menu item appears in the sidebar, allowing you to manage your organization's structure.
 ## What you can do
See your organization's structure as a visual tree
Add new organizational layers (divisions, regions, etc.)
Drag and drop to reorganize the hierarchy
Assign roles and access at each level
## Understanding the hierarchy
The organization hierarchy is a tree structure that represents how your business is organized. Each level in the hierarchy can have:
* **Name** — A descriptive label for the layer
* **Child layers** — Sub-divisions nested underneath
* **Bindings** — Role assignments that grant access at this level
Access is inherited down the hierarchy. Users with access to a parent layer automatically have access to all child layers beneath it.
## Create a new layer
Layers allow you to structure your organization into logical divisions (e.g., regions, departments, business units).
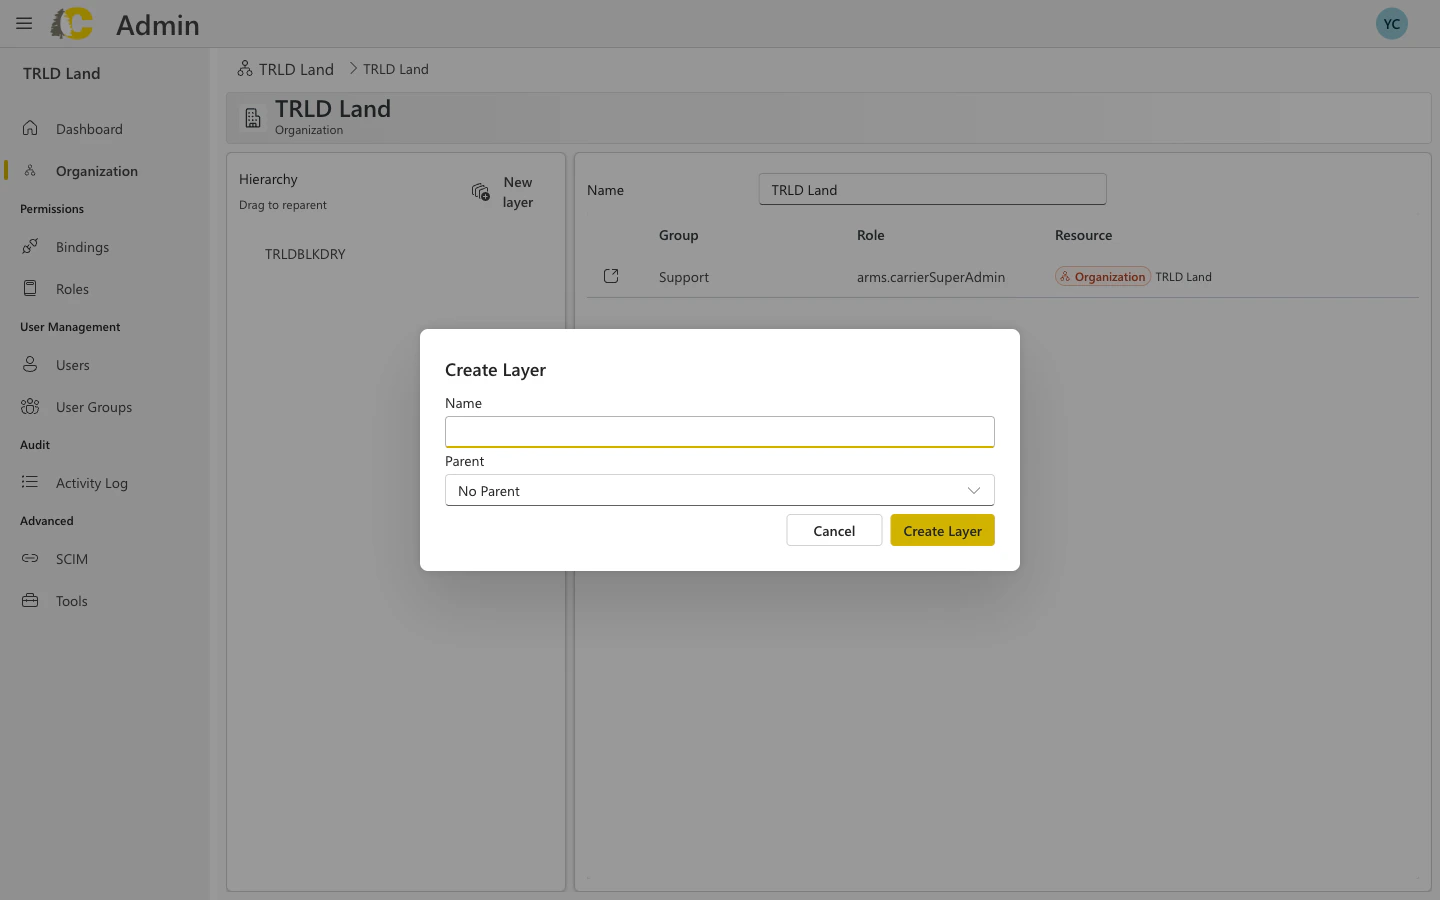
From the Organization page, click the **New layer** button in the Hierarchy section.
Give the layer a descriptive name that reflects its purpose in your organization.
Choose the parent layer in the hierarchy. Select "No Parent" for a top-level layer, or choose an existing layer to nest underneath.
Click **Create Layer**, then configure bindings to grant access at this layer level.
## What you can do
See your organization's structure as a visual tree
Add new organizational layers (divisions, regions, etc.)
Drag and drop to reorganize the hierarchy
Assign roles and access at each level
## Understanding the hierarchy
The organization hierarchy is a tree structure that represents how your business is organized. Each level in the hierarchy can have:
* **Name** — A descriptive label for the layer
* **Child layers** — Sub-divisions nested underneath
* **Bindings** — Role assignments that grant access at this level
Access is inherited down the hierarchy. Users with access to a parent layer automatically have access to all child layers beneath it.
## Create a new layer
Layers allow you to structure your organization into logical divisions (e.g., regions, departments, business units).
From the Organization page, click the **New layer** button in the Hierarchy section.
Give the layer a descriptive name that reflects its purpose in your organization.
Choose the parent layer in the hierarchy. Select "No Parent" for a top-level layer, or choose an existing layer to nest underneath.
Click **Create Layer**, then configure bindings to grant access at this layer level.
 ### Dialog fields explained
| Field | Description |
| ---------- | ----------------------------------------------------------------------------- |
| **Name** | A descriptive name for the layer (e.g., "West Region", "Operations Division") |
| **Parent** | The parent layer in the hierarchy, or "No Parent" for top-level layers |
## Reorganize with drag and drop
You can rearrange the hierarchy by dragging layers to new positions:
1. Click and hold on a layer in the tree
2. Drag it to its new parent
3. Release to reparent the layer
Reparenting a layer moves all its children and affects access inheritance. Users who had access through the old parent may lose access after the move.
## Manage bindings at each level
Each layer in the hierarchy can have its own bindings. Click on a layer to see and manage its bindings in the right panel.
| Column | Description |
| ------------ | ------------------------------------------------- |
| **Group** | The user group that has access |
| **Role** | The permissions granted |
| **Resource** | The scope of access (Organization, Carrier, etc.) |
Bindings at a higher level in the hierarchy cascade down to all child layers. You don't need to recreate bindings at every level.
## Best practices
Design your hierarchy to match how your organization actually operates. This makes it intuitive for users to understand access levels.
Avoid creating too many layers. A deep hierarchy can be confusing and harder to manage. Most organizations work well with 2-4 levels.
Layer names should be immediately understandable. Avoid abbreviations or codes that require explanation.
Sketch out your hierarchy before creating it. Reorganizing later is possible but affects access inheritance.
## Getting started with organizations
Organizations are set up by Cedar as part of the initial configuration. Contact your account representative to enable organization management for your account.
To request organization setup:
1. Contact Cedar support or your account representative
2. Describe your organizational structure needs
3. Cedar will configure the initial structure in the [Tools](/user-docs/admin/tools-api-keys) page
4. Once set up, the Organization menu item appears and you can manage it yourself
## Related pages
Initial organization setup and advanced options
Learn more about role bindings
Manage the groups that get access
Deep dive into access control
### Dialog fields explained
| Field | Description |
| ---------- | ----------------------------------------------------------------------------- |
| **Name** | A descriptive name for the layer (e.g., "West Region", "Operations Division") |
| **Parent** | The parent layer in the hierarchy, or "No Parent" for top-level layers |
## Reorganize with drag and drop
You can rearrange the hierarchy by dragging layers to new positions:
1. Click and hold on a layer in the tree
2. Drag it to its new parent
3. Release to reparent the layer
Reparenting a layer moves all its children and affects access inheritance. Users who had access through the old parent may lose access after the move.
## Manage bindings at each level
Each layer in the hierarchy can have its own bindings. Click on a layer to see and manage its bindings in the right panel.
| Column | Description |
| ------------ | ------------------------------------------------- |
| **Group** | The user group that has access |
| **Role** | The permissions granted |
| **Resource** | The scope of access (Organization, Carrier, etc.) |
Bindings at a higher level in the hierarchy cascade down to all child layers. You don't need to recreate bindings at every level.
## Best practices
Design your hierarchy to match how your organization actually operates. This makes it intuitive for users to understand access levels.
Avoid creating too many layers. A deep hierarchy can be confusing and harder to manage. Most organizations work well with 2-4 levels.
Layer names should be immediately understandable. Avoid abbreviations or codes that require explanation.
Sketch out your hierarchy before creating it. Reorganizing later is possible but affects access inheritance.
## Getting started with organizations
Organizations are set up by Cedar as part of the initial configuration. Contact your account representative to enable organization management for your account.
To request organization setup:
1. Contact Cedar support or your account representative
2. Describe your organizational structure needs
3. Cedar will configure the initial structure in the [Tools](/user-docs/admin/tools-api-keys) page
4. Once set up, the Organization menu item appears and you can manage it yourself
## Related pages
Initial organization setup and advanced options
Learn more about role bindings
Manage the groups that get access
Deep dive into access control