> ## Documentation Index
> Fetch the complete documentation index at: https://docs.cedarai.com/llms.txt
> Use this file to discover all available pages before exploring further.
# Users
> Invite, view, and manage individual users.
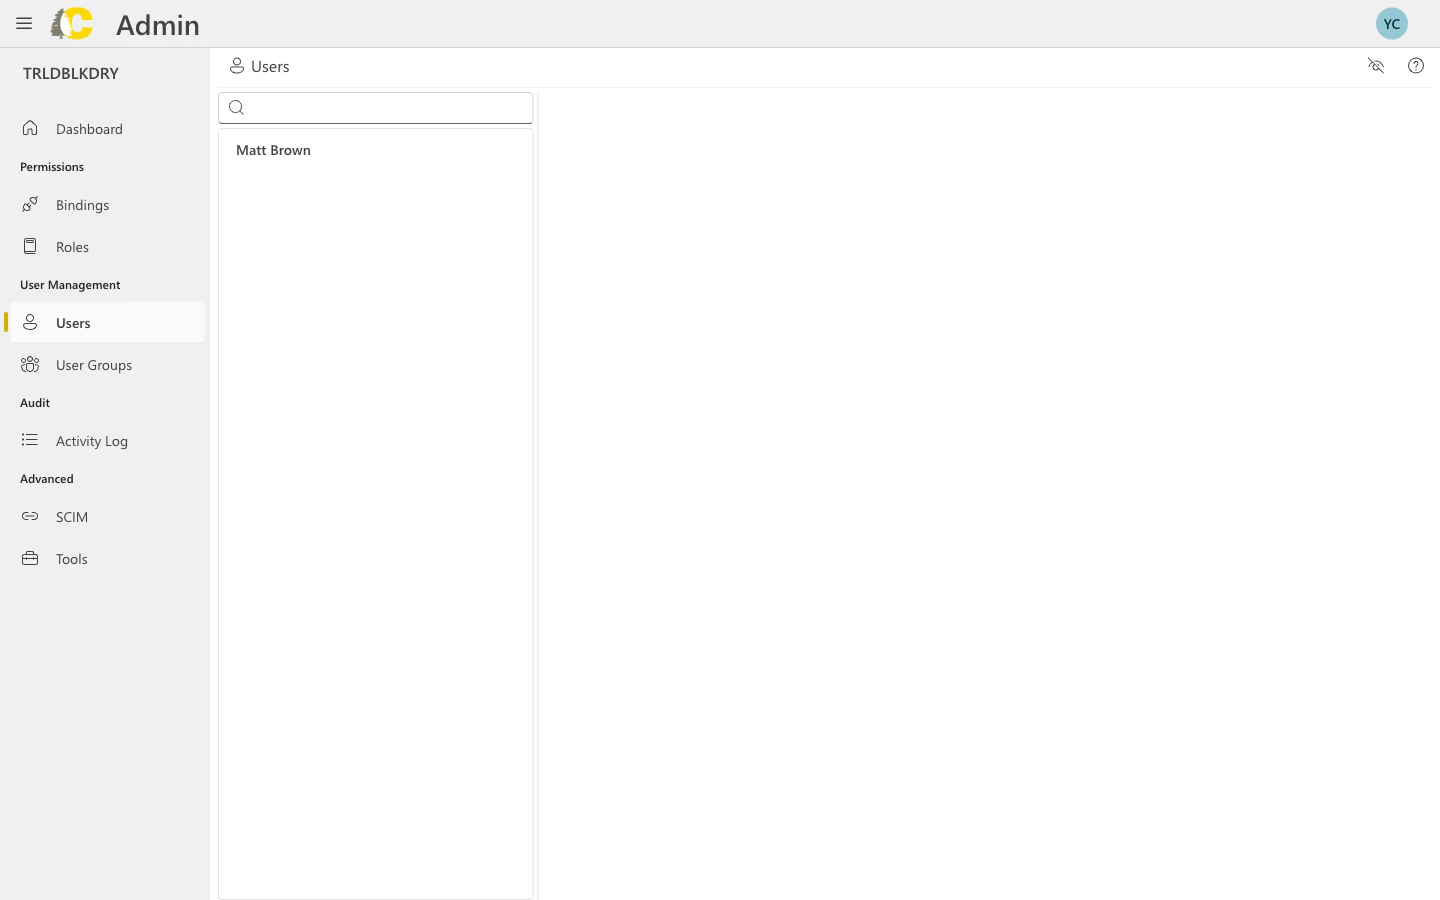
The Users page is where you manage individual people who can sign in to Cedar.
 ***
## How to invite a user
Users are invited through the **User Groups** page. When you invite a user, they're automatically added to the group — this ensures every user has proper access from the start.
Navigate to **User Groups** in the left sidebar of the Admin Portal.
Click on the group you want to add the user to. The group's detail panel will open.
In the **Users in Group** section, click the **+** button to open the invitation dialog.
Type the user's email address and click **Add** to add it to the list. You can add multiple emails.
***
## How to invite a user
Users are invited through the **User Groups** page. When you invite a user, they're automatically added to the group — this ensures every user has proper access from the start.
Navigate to **User Groups** in the left sidebar of the Admin Portal.
Click on the group you want to add the user to. The group's detail panel will open.
In the **Users in Group** section, click the **+** button to open the invitation dialog.
Type the user's email address and click **Add** to add it to the list. You can add multiple emails.
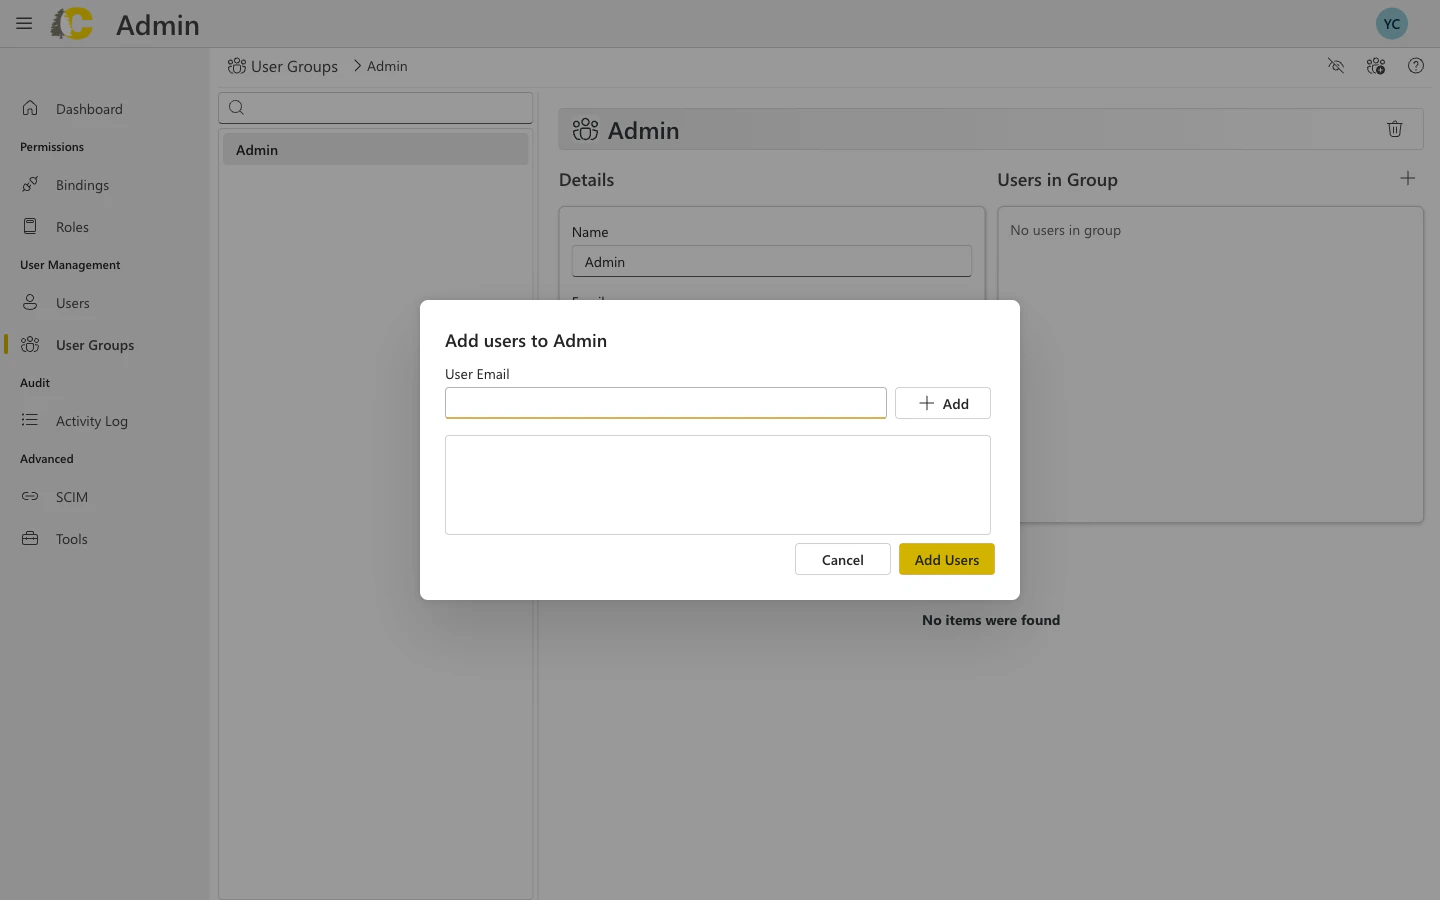 Click **Add Users** to send invitation emails. The users will appear in the group with **Invited** status.
Each user will receive an email with a link to set up their account. Once they complete registration (or sign in via SSO), their status changes to **Registered**.
**Why invite through groups?** This design ensures users always have proper access. A user without group membership has no permissions, so inviting directly into a group streamlines onboarding.
***
## How to add an existing user to another group
If a user already exists and you want to add them to an additional group:
Navigate to **User Groups** in the left sidebar.
Click on the group you want to add the user to.
Click the **+** button in the **Users in Group** section, enter the user's email, and click **Add Users**.
If the user already exists, they'll be added to the group immediately without receiving a new invitation email.
Users inherit all role assignments from their groups. This is the preferred approach over assigning roles directly to individuals.
***
## How to check why a user can't log in
When someone reports they can't access Cedar, follow these steps to investigate.
Use the search box to find the user by their email address.
Look at the **Status** column:
| Status | Meaning |
| -------------- | ------------------------------------ |
| **Registered** | Account is active and ready to use |
| **Pending** | Invitation sent but not yet accepted |
| **Disabled** | Account has been deactivated |
Make sure the email address matches exactly what the user is trying to sign in with.
Open the user detail panel and verify they belong to a group that has the necessary role bindings for what they're trying to access.
If the user's status is **Pending** and they can't find the email, resend the invitation.
If a user has no group memberships or their groups have no role bindings, they won't be able to access any resources even if their account is registered.
***
## User details view
Click **Add Users** to send invitation emails. The users will appear in the group with **Invited** status.
Each user will receive an email with a link to set up their account. Once they complete registration (or sign in via SSO), their status changes to **Registered**.
**Why invite through groups?** This design ensures users always have proper access. A user without group membership has no permissions, so inviting directly into a group streamlines onboarding.
***
## How to add an existing user to another group
If a user already exists and you want to add them to an additional group:
Navigate to **User Groups** in the left sidebar.
Click on the group you want to add the user to.
Click the **+** button in the **Users in Group** section, enter the user's email, and click **Add Users**.
If the user already exists, they'll be added to the group immediately without receiving a new invitation email.
Users inherit all role assignments from their groups. This is the preferred approach over assigning roles directly to individuals.
***
## How to check why a user can't log in
When someone reports they can't access Cedar, follow these steps to investigate.
Use the search box to find the user by their email address.
Look at the **Status** column:
| Status | Meaning |
| -------------- | ------------------------------------ |
| **Registered** | Account is active and ready to use |
| **Pending** | Invitation sent but not yet accepted |
| **Disabled** | Account has been deactivated |
Make sure the email address matches exactly what the user is trying to sign in with.
Open the user detail panel and verify they belong to a group that has the necessary role bindings for what they're trying to access.
If the user's status is **Pending** and they can't find the email, resend the invitation.
If a user has no group memberships or their groups have no role bindings, they won't be able to access any resources even if their account is registered.
***
## User details view
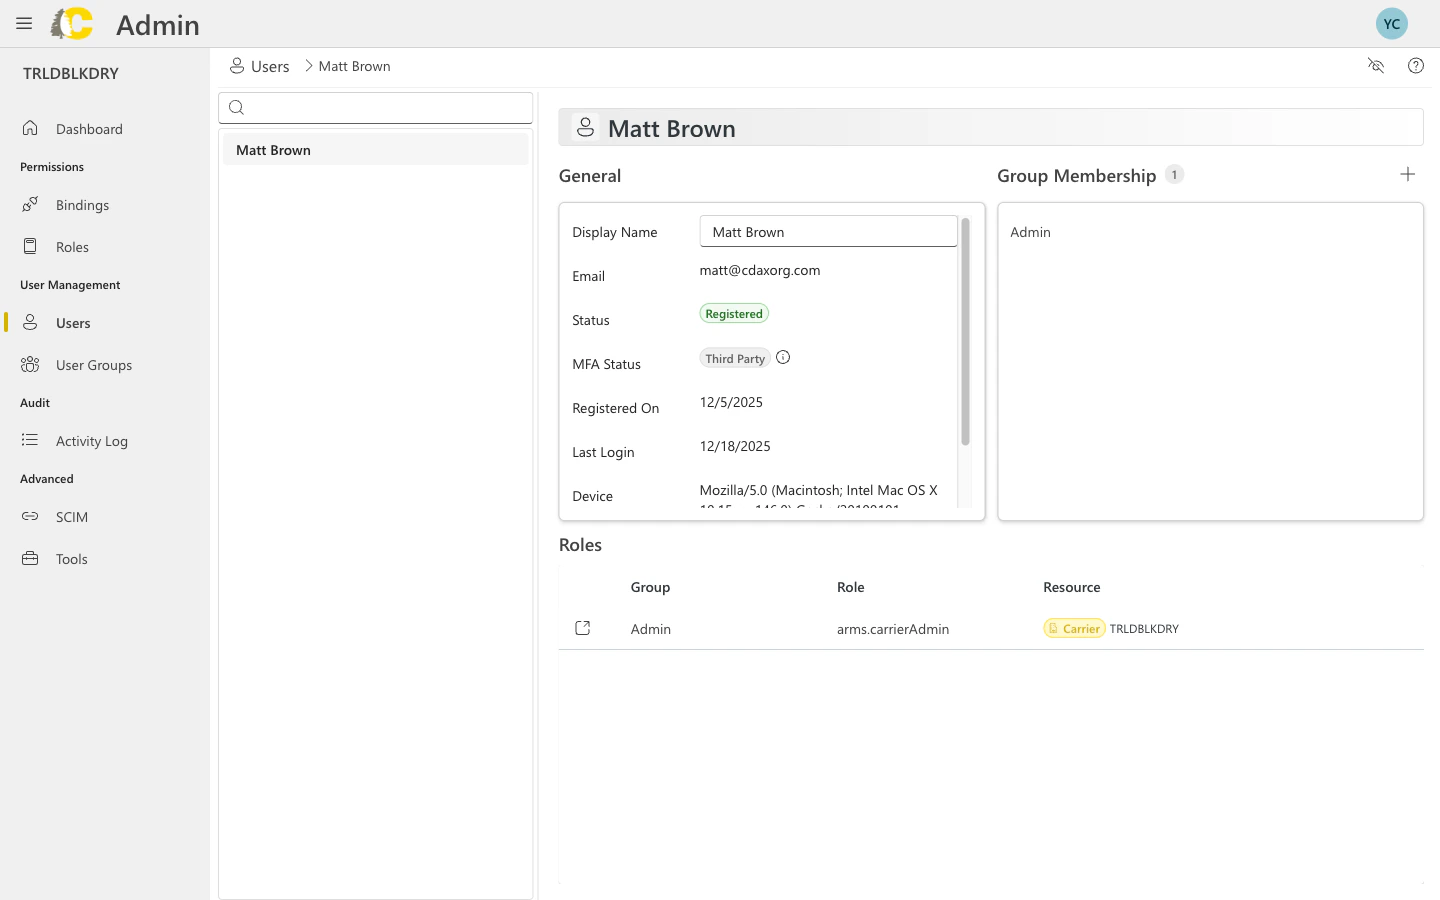 Click on any user to see their detail panel, which includes:
* **Display name and email** — How they appear in the system
* **Account status** — Registered, Pending, or Disabled
* **MFA status** — Whether multi-factor authentication is enabled
* **Last login time** — When they last signed in
* **Group memberships** — Which groups they belong to
* **Role assignments** — Direct roles (if any) assigned to this user
***
## User status lifecycle
Users go through different states as they interact with Cedar. Understanding these states helps you manage accounts effectively.
```mermaid theme={null}
stateDiagram-v2
[*] --> Invited: Admin invites
Invited --> Confirmed: Opens email link
Click on any user to see their detail panel, which includes:
* **Display name and email** — How they appear in the system
* **Account status** — Registered, Pending, or Disabled
* **MFA status** — Whether multi-factor authentication is enabled
* **Last login time** — When they last signed in
* **Group memberships** — Which groups they belong to
* **Role assignments** — Direct roles (if any) assigned to this user
***
## User status lifecycle
Users go through different states as they interact with Cedar. Understanding these states helps you manage accounts effectively.
```mermaid theme={null}
stateDiagram-v2
[*] --> Invited: Admin invites
Invited --> Confirmed: Opens email link
(Cedar managed only)
Invited --> Registered: First SSO login
(SSO users)
Invited --> Invitation_Expired: 2 weeks expire
Confirmed --> Registered: Completes registration
Registered --> Deactivated: Admin deactivates
Deactivated --> Registered: Admin reactivates
Invitation_Expired --> Invited: Resend invite
note right of Confirmed
Optional state
Only for Cedar managed users
end note
```
Go through **Confirmed** state when they click the email link, then complete registration to become **Registered**.
**Skip Confirmed** entirely — they go directly from **Invited** to **Registered** on first SSO login.
| Status | Description | Can sign in? |
| ---------------------- | ------------------------------------------------------------ | ------------ |
| **Invited** | Invitation sent, waiting for user to take action | No |
| **Confirmed** | User opened the registration email link (Cedar managed only) | No |
| **Registered** | Account is active and fully set up | Yes |
| **Invitation Expired** | User didn't respond within 2 weeks | No |
| **Deactivated** | Account has been disabled by an administrator | No |
**Why SSO users skip Confirmed**: SSO users authenticate through your identity provider (Okta, Azure AD, or Google), so there's no separate email verification step. When they sign in via SSO for the first time, Cedar recognizes them as an external provider user and automatically marks them as Registered.
**Invitation expiration**: Invitations expire after **2 weeks**. If an invitation expires, you can resend it from the Admin Portal to reset the timer and move the user back to **Invited** status.
**Reactivating users**: If a user was previously Deactivated but has valid credentials (e.g., they previously completed registration), an admin can reactivate them back to Registered status.
***
## SSO users vs Cedar managed users
There are two ways users can authenticate with Cedar. Understanding the difference helps you choose the right approach for your organization.
**Cedar managed users** have accounts created and maintained directly in Cedar.
**How they're created:**
* Manually invited through the Admin Portal
* You enter their email, first name, and last name
**How they sign in:**
* Use the Cedar login page
* Enter their email and password
* Optionally use MFA (if enabled)
**Who manages credentials:**
* Users set their own password during registration
* Password resets go through Cedar
* MFA is configured in Cedar
**Best for:**
* Small teams without an identity provider
* External partners or contractors
* Organizations not using SSO
**SSO users** authenticate through your organization's identity provider (IdP) like Okta, Azure AD, or Google.
**How they're created:**
* Manually invited through the Admin Portal (same as Cedar managed)
* Optionally via [SCIM provisioning](/user-docs/admin/scim) for automated sync
**How they sign in:**
* Redirected to your identity provider
* Authenticate with corporate credentials
* Automatically signed into Cedar
**Who manages credentials:**
* Your IT team manages passwords in the IdP
* MFA is enforced by the IdP
* Cedar trusts the IdP's authentication
**Best for:**
* Enterprise organizations with existing IdPs
* Centralized security and compliance requirements
* Teams wanting single sign-on convenience
For SSO setup, see the [SSO documentation](/user-docs/sso/overview).
### Key differences at a glance
| Aspect | Cedar Managed | SSO |
| ----------------------- | ------------------------------ | ---------------------------------------- |
| **Account creation** | Manual invite | Manual invite or SCIM (optional) |
| **Password management** | Cedar (Cognito) | Identity Provider |
| **MFA** | Cedar SMS-based MFA (optional) | Identity Provider handles MFA |
| **Offboarding** | Manually disable in Cedar | Manually disable, or via SCIM if enabled |
| **Group sync** | Manual assignment | Manual, or automatic via SCIM if enabled |
| **Registration flow** | Invite → Confirm → Register | Invite → Register (skips Confirm) |
**MFA for SSO users**: If a user authenticates via SSO (Okta, Azure AD, Google), their MFA settings are managed by your identity provider, not Cedar. The MFA settings in the Admin Portal only apply to Cedar managed users.
**Hybrid approach**: You can have both SSO and Cedar managed users in the same organization. This is common when you have internal employees using SSO and external partners using Cedar managed accounts.
**Learn more**: For SSO setup instructions, see the [SSO Overview](/user-docs/sso/overview). For optional automated user provisioning, see [SCIM Provisioning](/user-docs/sso/scim/overview).
***
## Best practices
Instead of assigning roles directly to users, add users to groups and assign roles to the groups. This makes access much easier to manage when team members change.
If someone isn't receiving their invitation email, ask them to check their spam folder. Also verify the email address is spelled correctly.
For Cedar managed users, encourage enabling SMS-based MFA for extra security. You can see each user's MFA status in their detail panel. SSO users' MFA is managed by your identity provider.
Maintain up-to-date names and email addresses. This helps with auditing and makes it easier for colleagues to identify users.
***
## Related pages
Organize users into teams for easier access management
See how users get access through group memberships
Understand what permissions roles grant
Track user activity and changes