> ## Documentation Index
> Fetch the complete documentation index at: https://docs.cedarai.com/llms.txt
> Use this file to discover all available pages before exploring further.
# Interchanges
> Review interchange consists, receive inbound cars, and create a manual interchange in ARMS Mobile.
Use **Interchanges** to see inbound and outbound trains, bring cars online, and create a manual interchange when the consist is not already in the app.
## Open the Interchanges screen
Tap **Interchanges** in the bottom tab bar. If it is not there, tap **More**, then choose **Interchanges**.
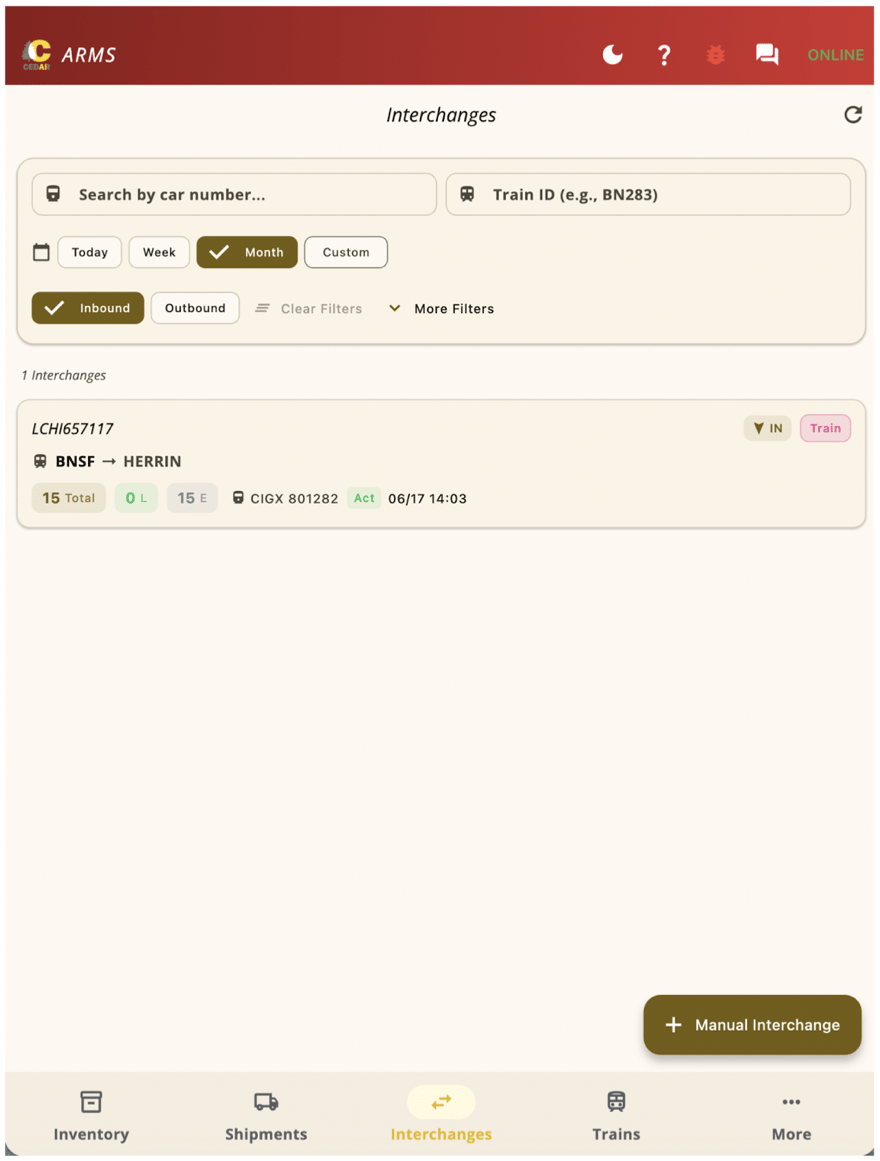 * The top of the screen shows the most recent interchanges.
* Use **Today / Week / Month**, **Inbound / Outbound**, and search by car number or train ID to narrow the list. Tap **More Filters** for additional options.
* Each card shows the train ID, the route (from → to), totals (**L** = loaded, **E** = empty), the lead car, and the time.
* Tap any card to open its details.
## View interchange details
The compact view is the default — one line per car.
* The top of the screen shows the most recent interchanges.
* Use **Today / Week / Month**, **Inbound / Outbound**, and search by car number or train ID to narrow the list. Tap **More Filters** for additional options.
* Each card shows the train ID, the route (from → to), totals (**L** = loaded, **E** = empty), the lead car, and the time.
* Tap any card to open its details.
## View interchange details
The compact view is the default — one line per car.
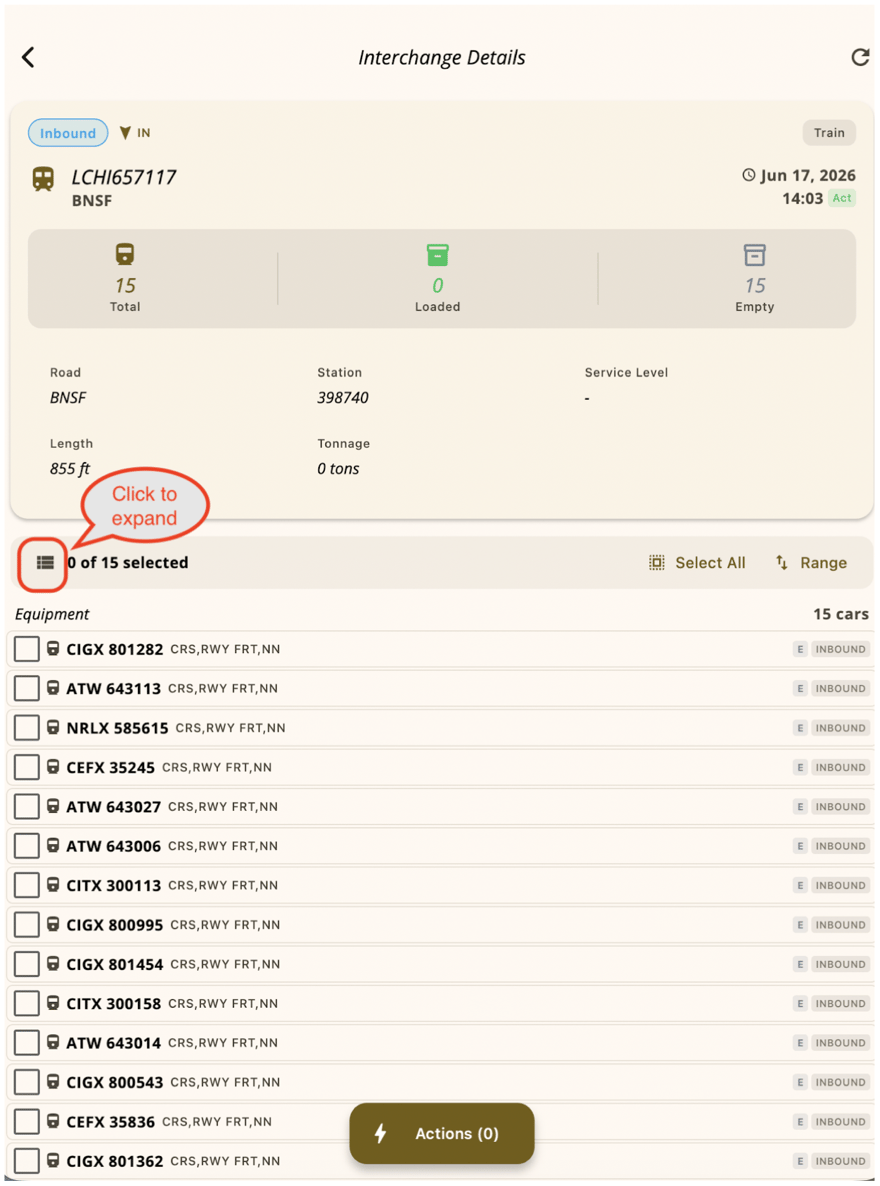 1. **Totals** — total cars, loaded count, and empty count.
2. **Length and tonnage** for the whole interchange, plus the connecting road, station, and service level.
3. Tap the view-toggle icon on the left of the yellow selection bar to switch to the expanded view.
### Expanded view
Expanded rows show extra detail: commodity, ICHR timestamp, customer codes, and block.
1. **Totals** — total cars, loaded count, and empty count.
2. **Length and tonnage** for the whole interchange, plus the connecting road, station, and service level.
3. Tap the view-toggle icon on the left of the yellow selection bar to switch to the expanded view.
### Expanded view
Expanded rows show extra detail: commodity, ICHR timestamp, customer codes, and block.
 ## Receive an interchange
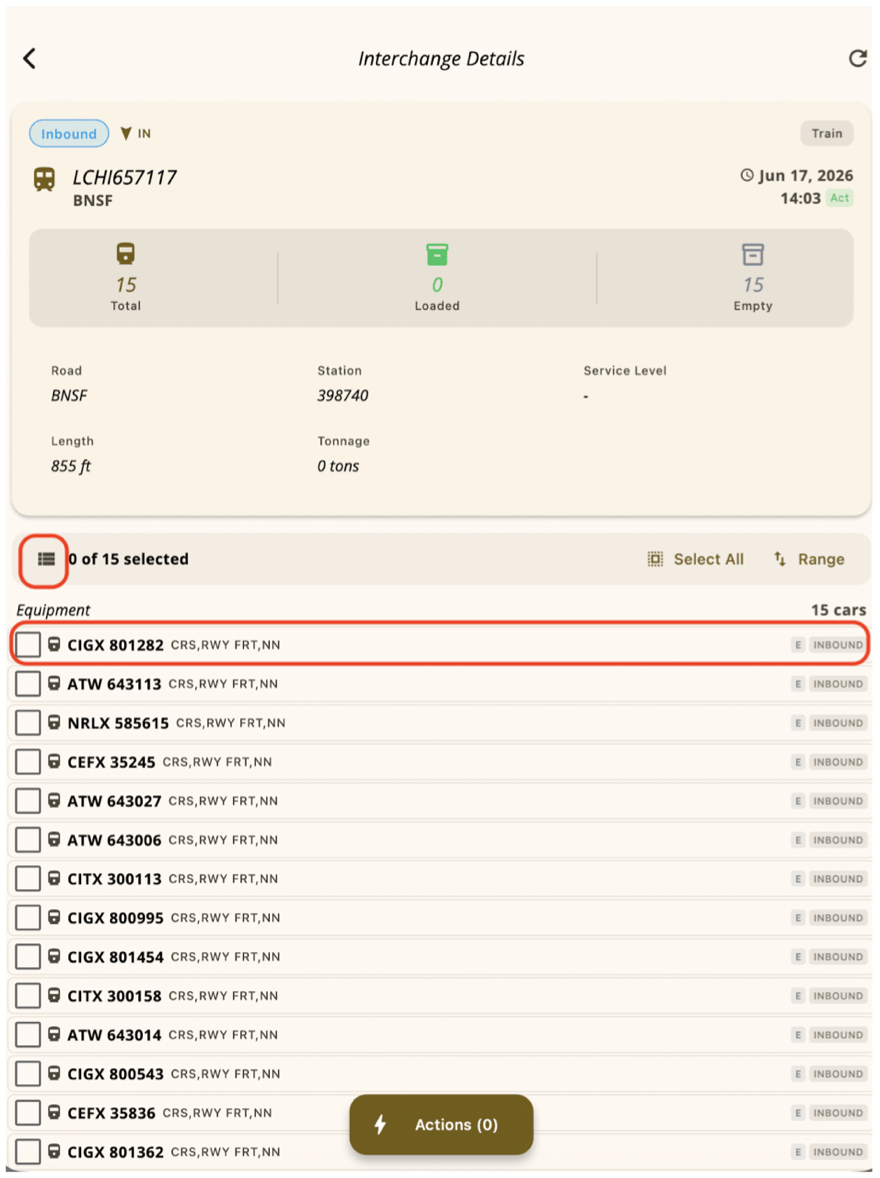
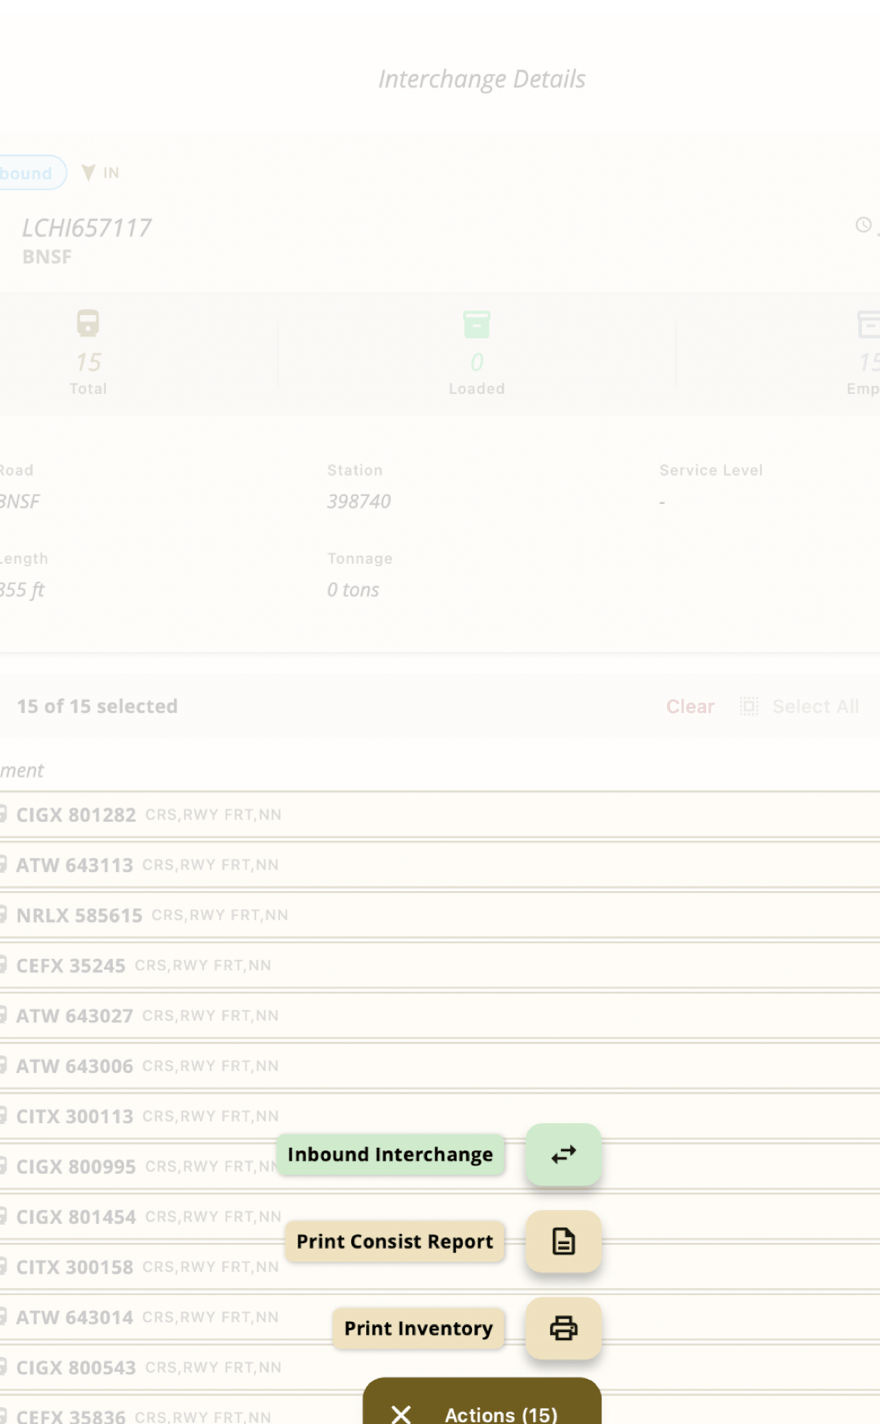
Bring selected cars online with **Inbound Interchange**. Unchecked cars are left off the consist.
By default no cars are selected. Tap **Select All** to take everything, or tap individual checkboxes to pick specific cars.
If a few cars are missing, damaged, or not yours, leave them unchecked. Only checked cars are included.
## Receive an interchange
Bring selected cars online with **Inbound Interchange**. Unchecked cars are left off the consist.
By default no cars are selected. Tap **Select All** to take everything, or tap individual checkboxes to pick specific cars.
If a few cars are missing, damaged, or not yours, leave them unchecked. Only checked cars are included.
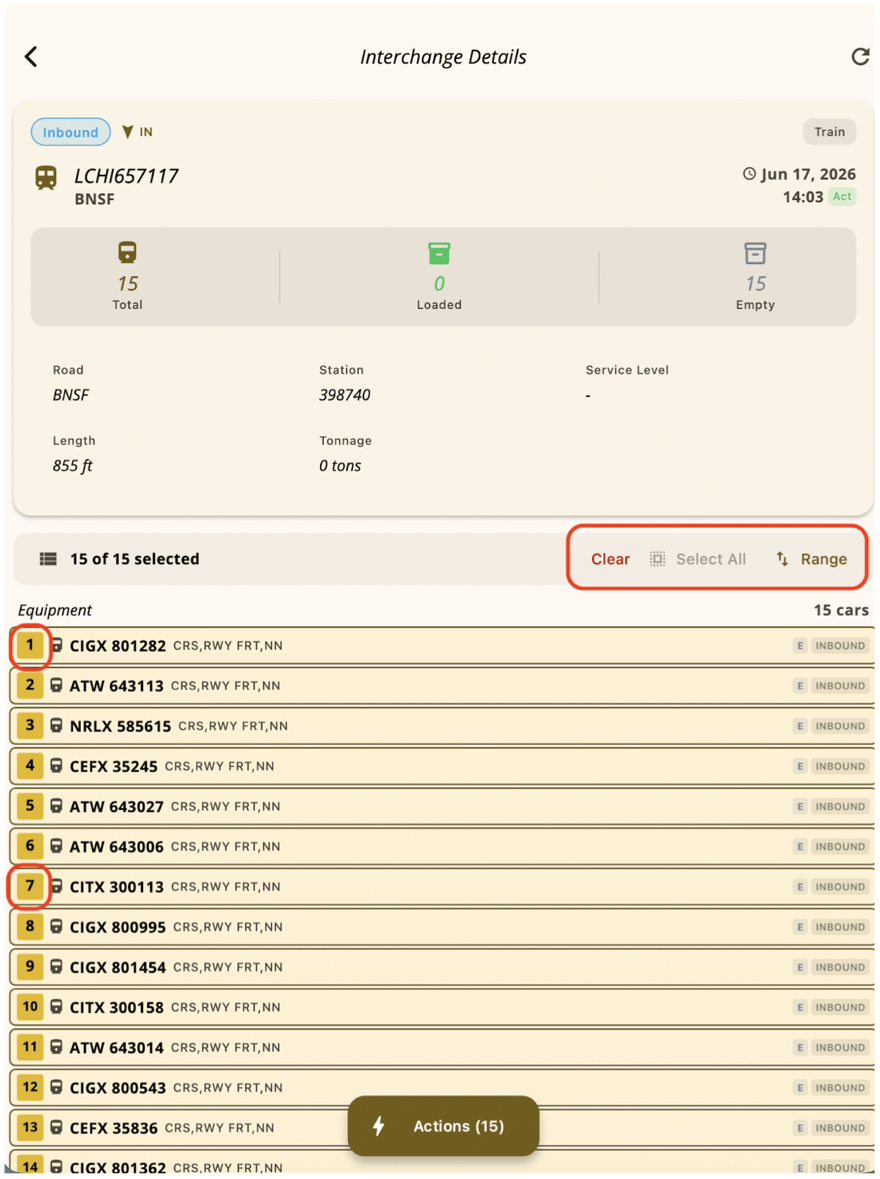 Tap **Actions** (the number is how many cars are selected), then tap **Inbound Interchange**.
 ## Create a manual interchange
Tap **+ Manual Interchange** on the list when you need to enter a train that is not already in the app.
## Create a manual interchange
Tap **+ Manual Interchange** on the list when you need to enter a train that is not already in the app.
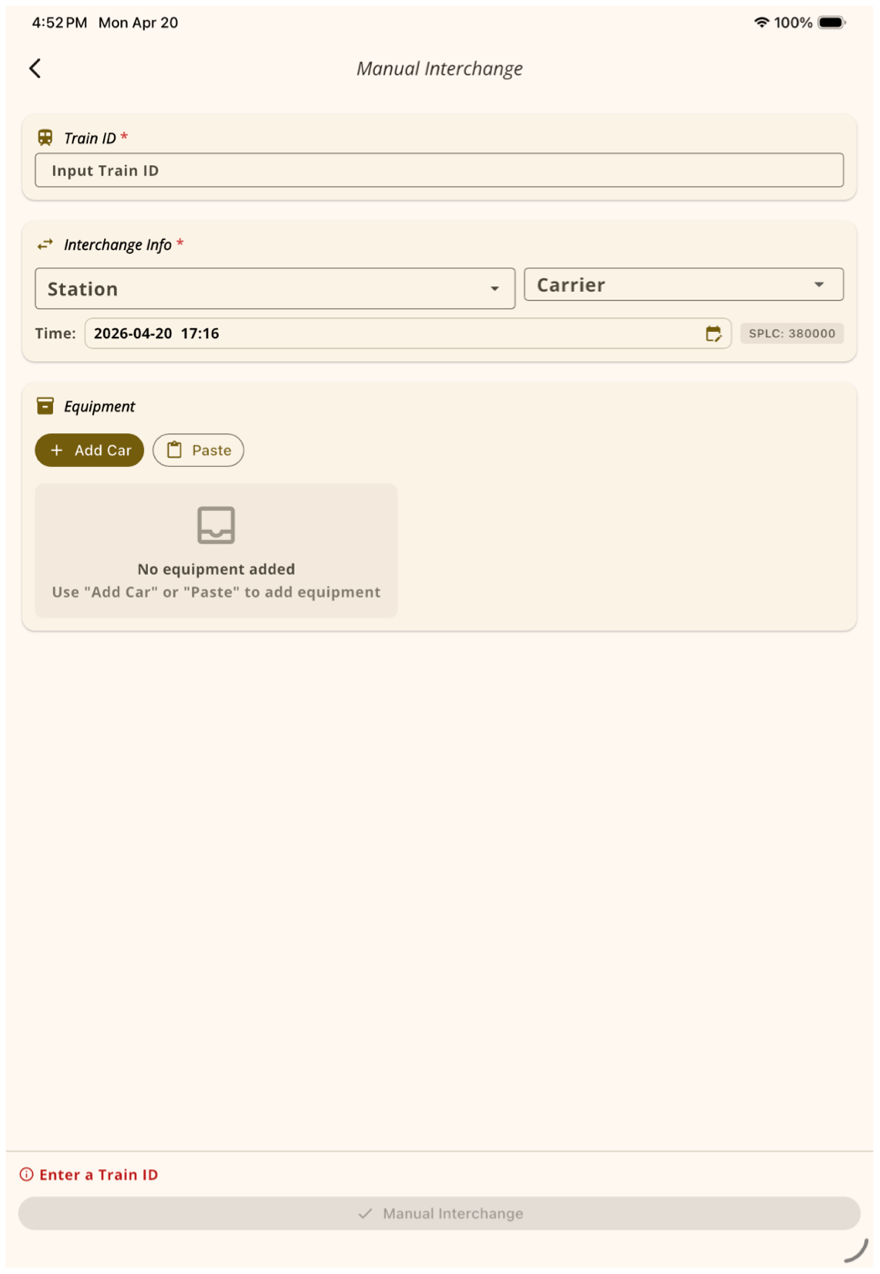 1. **Train ID** (required) — the inbound train identifier.
2. **Station** and **Carrier** (required) — where the interchange happens and the connecting railroad. Time and SPLC fill in automatically and can be edited.
3. Tap **Add Car** to type cars one at a time, or **Paste** to drop in a list of car IDs.
4. The **Manual Interchange** button at the bottom turns active when the required fields are filled. Tap it to create the interchange.
## Related pages
Tabs, More menu, and switching carriers
Move received cars once they are online
Interchanges in the ARMS desktop app
## Related topics
- [Cedar Mobile](/user-docs/mobile/overview.md)
- [Inventory](/user-docs/mobile/inventory.md)
- [Sandbox](/user-docs/arms/ops/sandbox.md)
- [EDI Waybill Messaging](/user-docs/arms/edi-messaging.md)
- [Introduction](/user-docs/index.md)
1. **Train ID** (required) — the inbound train identifier.
2. **Station** and **Carrier** (required) — where the interchange happens and the connecting railroad. Time and SPLC fill in automatically and can be edited.
3. Tap **Add Car** to type cars one at a time, or **Paste** to drop in a list of car IDs.
4. The **Manual Interchange** button at the bottom turns active when the required fields are filled. Tap it to create the interchange.
## Related pages
Tabs, More menu, and switching carriers
Move received cars once they are online
Interchanges in the ARMS desktop app
## Related topics
- [Cedar Mobile](/user-docs/mobile/overview.md)
- [Inventory](/user-docs/mobile/inventory.md)
- [Sandbox](/user-docs/arms/ops/sandbox.md)
- [EDI Waybill Messaging](/user-docs/arms/edi-messaging.md)
- [Introduction](/user-docs/index.md)